a client came to me recently with a simple brief: "i want a tiktok account that runs itself. i give the topic. ai does everything else."
the client didn't have time. he insisted on the fact, i don't want to do anything at all, just give the idea and that's it.
he also wanted everything to be local and not to use third-party apps, which are limited and very expensive.
so he wanted script. voiceover. images. animations. editing. subtitles. sound design. final render. all automated.
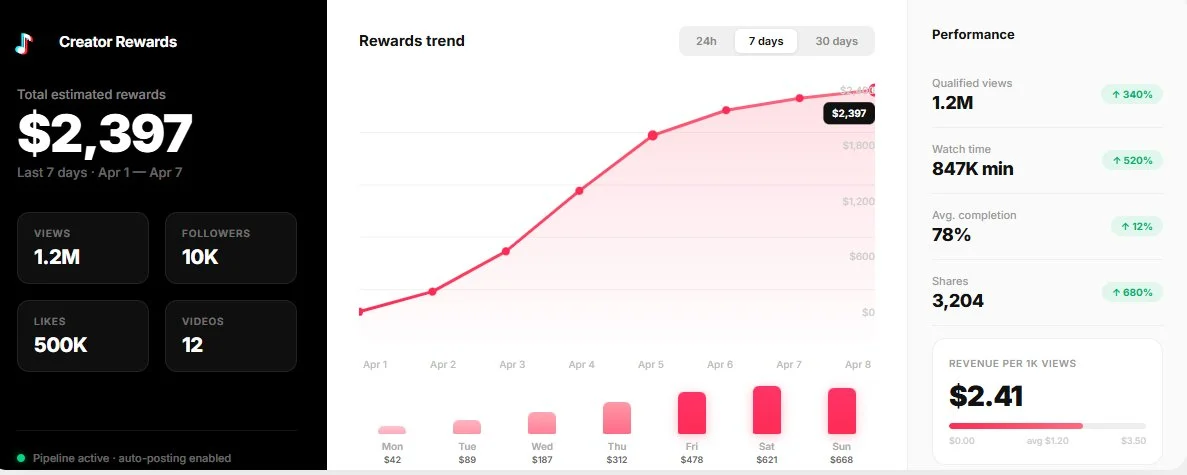
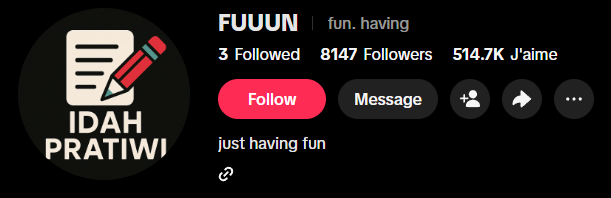
i built him that pipeline. in 1 week, on a brand new account: 10K followers, 500K likes. no ads. no boosts. just ai-generated content, posted consistently.
here's exactly how the whole thing works. step by step.
the pipeline has 10 steps. the first 2 are prompting. the rest is python + ffmpeg. ~700 lines of code total. all you need: python, ffmpeg, an elevenlabs api key, and an image/video generation tool of your choice.
you own every step. you control the voice, the visuals, the pacing, the subtitles, the sound design. no content restrictions. no creative ceiling.
𝟏. project rules
before you write a single script, you need to define the rules of your project. this is the most important step. nail it and every video feels like it belongs to the same channel.
what you're defining here:
- the type of content (storytelling? tutorials? commentary? listicles?)
- the visual style (anime? realistic? 3d? minimalist?)
- the tone of voice (dramatic narrator? casual explainer? hype?)
- hard rules, things that must always or never happen (no text in images, no faces for certain characters, always use lowercase subtitles, etc)
- the video structure template (hook → development → climax → conclusion)
- duration targets (60 sec? 90 sec? 2 min?)
this is your brand bible. and it needs to live somewhere the ai can read every time it works.
here's how: create a claude project on cowork. inside that project, you write a CLAUDE.md file with all your rules. this file acts as persistent instructions, every time claude works on your pipeline, it reads these rules first.
you can also use claude's memory system. when you discover something that works (a certain hook format that gets more views, a visual style tweak that looks better), you tell claude to remember it. it saves it to memory files that persist across conversations. your pipeline gets smarter over time.
the whole point of using cowork: you can do all of this from your phone. you open the app, give claude the topic for the next video, and the rules are already loaded.
2. script generation
everything starts with a prompt to an llm. you feed it the topic, it outputs a full narration script structured in sections: hook, development, turning point, climax, conclusion.
the script is written specifically for text-to-speech. that means expressive punctuation matters. ellipses, exclamation marks, line breaks, they all directly influence how the tts model speaks. most people skip this. it's the difference between a robotic voiceover and one that sounds like a real narrator.
output: a clean markdown file with the raw narrator text.
example prompt:
3. scene breakdown
from that script, you generate a structured file (json or markdown) where each scene has 3 things:
- the narrated text (what the voiceover says)
- an image prompt (to generate the scene's illustration)
- an animation prompt (to turn that image into a ~5 sec video)
each scene is roughly 5 seconds. a 75-second video = 15 scenes. a 2-minute video = 25 scenes.
the visual style and rules you defined in step 1 are automatically injected into every prompt. claude already knows your aesthetic. you don't repeat yourself.
example output for the opus 4.6 script from step 2:
𝟒. voiceover generation (elevenlabs api)
@ElevenLabs is the best text-to-speech platform right now. not close. the voices sound human, they handle emotion and pacing naturally, and the api is dead simple.
if you've tried google tts or amazon polly you know the difference, elevenlabs sounds like a real person recorded it in a studio.
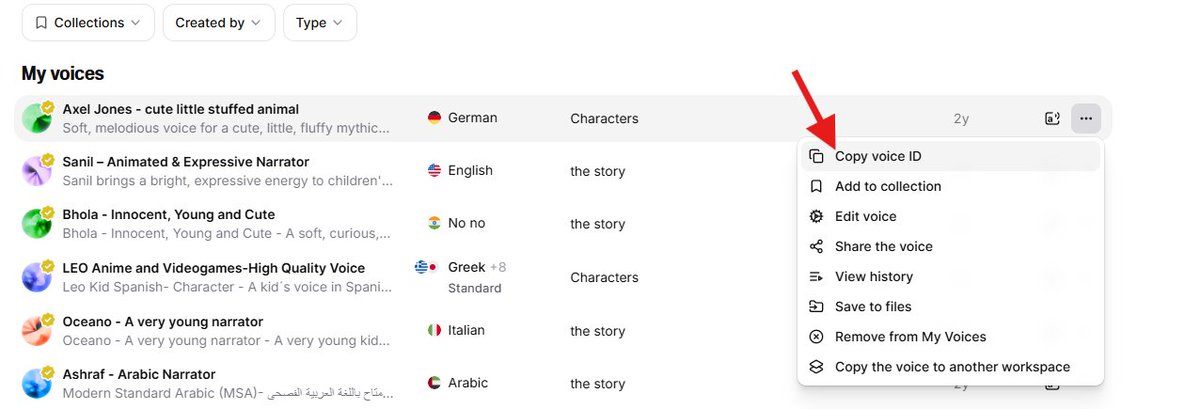
first thing you do: go to elevenlabs and browse their voice library. pick a voice that fits your content and stick with it across every video. your audience should recognize the narrator before they even look at the screen.

spend time on this. try 5-10 voices with a sample of your script. once you've found the one, save the voice id, you'll need it for the api.
now for the actual generation, you have 2 options:
option 1: claude does it for you. if you're using claude in chrome, it can go to elevenlabs, paste your script, select your voice, generate the audio, and download the mp3. no code needed.
option 2: claude runs a python script. ~20 lines of code. you give it your elevenlabs api key and voice id, it sends the full script in one api call and saves the mp3.
why one call instead of scene by scene? because the model handles pacing, pauses, and intonation way better when it has the full context. scene-by-scene gives you 15 clips that sound disconnected when stitched together. one call gives you a natural, continuous flow.
key settings to tweak:
- stability: 0.30 (low = more expressive, more variation)
- similarity_boost: 0.78
- style: 0.75 (high = more dramatic delivery)
play with these. lower stability = more emotion but less predictable. higher style = more theatrical. find the sweet spot for your content.
output: full_narration.mp3
𝟓. word-level timestamps (elevenlabs stt)
you send that same mp3 back to elevenlabs, this time to their speech-to-text api (scribe). it returns the exact timing of every single word.
output looks like this:
{ "word": "sacrifice", "start": 1.234, "end": 1.567 }
this is the backbone of everything that follows. scene sync, karaoke subtitles, audio alignment, all of it depends on these timestamps. without word-level precision, the whole pipeline falls apart.
𝟔. image and video generation
this is the most expensive step. there are 2 approaches and the choice depends on your budget vs volume.
after testing dozens of image and video generation tools, the best combo right now is nano bannana for images and kling for video. not just quality-wise, price-wise too. they have the best quality-to-cost ratio on the market by far.
kling is the best image-to-video model available right now. you feed it an image + a motion prompt, it gives you a 5-second clip that follows the prompt. most competitors either ignore half your instructions or give you weird artifacts. kling is consistent, the motion is smooth, and the pricing is good.
option a: apis (nano bannana + kling)
you send each image prompt to the nano bannana api for illustration generation. then send each image + its animation prompt to the kling api for a 5-second video.
it's fast. ~2-3 min per scene running in parallel. but you pay per request. for a 15-scene video that's 15 image calls + 15 video calls. scale that to 3 videos a week and costs add up quick.
option b: claude in chrome extension
claude opens a browser, navigates to the generation tools (midjourney, kling, runway, etc), pastes each prompt, launches generation, downloads the result, renames it, and files it in the right folder. fully autonomous.
it's slower (sequential instead of parallel). but way cheaper: instead of paying per api request, you pay a flat monthly subscription to the tools. if you're producing volume, this saves a ton of money.
same output either way: numbered images (01.png to 15.png) and numbered videos (1.mp4 to 15.mp4).
𝟕. automatic scene boundary detection
now you have audio with word timestamps and scene text from the script. the python code aligns them automatically.
it takes each scene's words from the script, matches them to the stt words by index, and computes exactly where each scene starts and ends in the audio. between scenes, it takes the midpoint of the silence gap so transitions are clean.
output: scene_boundaries.json → "scene 3: 12.4s to 17.8s"
𝟖. video assembly (ffmpeg)
each scene video is trimmed or extended to match the exact duration from step 7.
source video longer than needed → trim. source video too short → ping-pong loop (play forward, then reverse, repeat) until it hits the target duration.
the hook (scene 1) can get special treatment like it's a rapid-fire slideshow of all the video's images flashing in a few seconds. followed by a 1-second freeze frame pause. this creates a teaser effect that stops the scroll.
all segments are concatenated with ffmpeg into one continuous video.
𝟗. audio mix
5 tracks mixed together:
- ambient background music looped for the full duration (volume 0.12, barely audible, just enough to fill the space)
- a whoosh sound effect (tape rewind) on the hook
- an impact hit at the end of the hook
- hook narration (boosted to 1.3x volume for punch)
- rest of narration (normal volume)
one ffmpeg command, 5 inputs, one output:
𝟏𝟎. karaoke subtitles
this is what makes it look professional. each word appears in uppercase, in groups of 3 max, with a karaoke effect: the word shifts from white to gold at the exact moment it's spoken.
technically it's an .ass file (advanced substation alpha) with \k tags for karaoke timing. impact font, size 86, outline 4, positioned in tiktok's safe zone (250px margin from bottom so the ui doesn't cover it).
the word timestamps from step 5 plug directly in here. every word is synced to the centisecond. here's how the subtitle events are built:
the .ass style header locks in the look:
gold primary color (&H0000D7FF), white secondary, outline 4, margin 250 from bottom. looks clean on every phone.
𝟏𝟏. final render
ffmpeg takes the assembled video + mixed audio + .ass subtitles and burns it all into one file.
x264 encoding, crf 20 (good quality, reasonable size), aac 192k audio, movflags +faststart (critical for tiktok streaming, lets the video start playing before it's fully downloaded).
conclusion
the full pipeline runs in ~10 min once images and videos are generated. the only bottleneck is step 6 (visual generation).
total stack: python + ffmpeg + elevenlabs api (voice + stt) + nano bannana/kling or claude in chrome (visuals). that's it.